

our products
We offer a rare combination: premium products at value pricing. Let us help you create the perfect ambiance for your home. Our color and design palettes complement any living style.
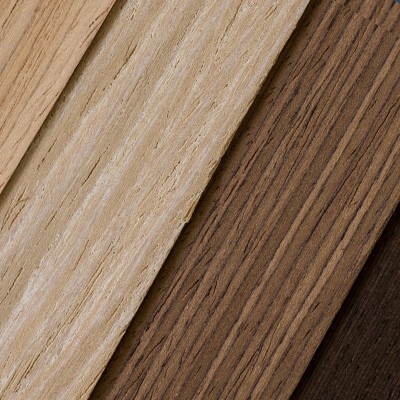
Natural Variety
Natural Variety
Hardwood comes in a wide array of species, each with their own colors, textures, and grain patterns.
Timeless
Timeless
Hardwood floors can be refinished multiple times, extending their lifespan considerably.

Budget Friendly
Budget Friendly
Hardwood is offered as solid plank or in engineered layers, allowing buyers to get the beauty of hardwood, regardless of budget.
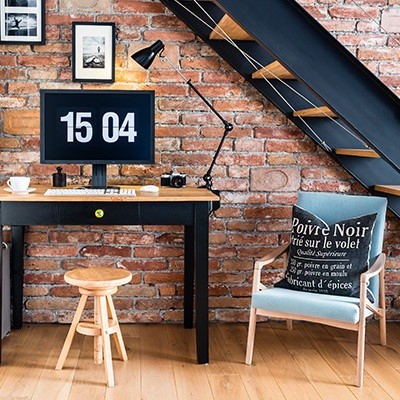
Customer
Service is Our Priority
At Chesapeake, we design everything with the customer in mind. Our product line caters to every taste and budget, with industry-leading warranties for peace of mind.
Warranty Information
Warranty Information
Before You Buy
For flooring to look and function at its best, there are a variety of conditions that need to be met: structural concerns on your project site, installation process details, etc. The absence of these necessary conditions can impact the final result of your flooring and even negate your warranty.
We provide detailed information about each product for you to read even before you purchase. Please review the specifications and documentation for your product (accessible on the corresponding collection page) to ensure that your project will meet the criteria.
Making a Claim
Warranty claims are conducted through our distributors, not directly through Chesapeake Flooring. Please gather your sale documentation and reach out to the original purchase location. Procedure varies from store to store, but generally at minimum you should expect to provide proof of purchase and installation information.
For other warranty questions or concerns, contact a sales associate through our contact form.
Care & Maintenance
hardwood care & maintenance
Tips:
- Use a soft broom or microfiber mop to remove dust
- If vacuuming, make sure beater bar is turned off or to a “hardwood” setting
- Use cleaning products specifically formulated for hardwood
- Do not wet mop or steam mop
- Wipe up liquid spills immediately
- Avoid walking on floor with pointed shoes like cleats or high heels
laminate care & maintenance
Tips:
- Sweep/clean frequently to avoid ground-in dirt
- Wipe up liquid spills immediately
- Use a damp (not drenched) mop with warm (not hot) water
- Avoid pine-scented cleaners
- Do not drag heavy or sharp objects which can gouge the surface
resilient care & maintenance
Tips:
- Sweep, vacuum, and dust regularly to avoid ground in dirt
- Use shampoo to get rid of hairspray buildup
- Use a damp mop with warm (not hot) water
- Rinse well to remove cleaning product residue
- Do not drag heavy or sharp objects which can gouge the surface
tile care & maintenance
Tips:
- Easiest to clean with an all-purpose household cleanser
- Use microfiber duster for everyday dirt removal
- Deep clean occasionally with a wet mop
- Steam cleaner can be used for deepest clean
- Use specialty cleaner and soft bristle brush on grout lines
carpet care & maintenance
Tips:
- Vacuum your carpet on a regular basis and more often as needed in high traffic areas.
- Quickly clean spots and spills, using only carpet cleaning products, to avoid damage to your carpet.
- Have your carpet professionally cleaned every 12 to 18 months to remove embedded dirt and dust particles.
- Help maintain your carpet by using door mats both inside and outside and by frequently changing the air filters in your home to help reduce dust particles that settle on your floors.
Installation
Click Lock
Description
Hardwood, laminate, and vinyl click lock products are created with a unique edge like a puzzle piece. Two sections of flooring "click" together and are "locked" firmly to one another. Click lock flooring floats; it's not attached to the subfloor. As a result, this is a simple, glue-free installation that is DIY-friendly.
When using click lock products, you must let the material "acclimate" inside at room temperature before you begin your installation. Otherwise, expansion, contraction, or warping may occur. The acclimation time varies by material, so consult the documentation that comes with your flooring.
Additional Tips: Be sure to provide space at the wall for expansion on all sides, and always begin the first row with the tongue (not the groove) facing away from the wall.
Requirements
Can be used on ground-level or above-ground subfloors, including those made of plywood, OSB board, concrete, tile, or radiant heating systems. The subfloor must be clean, level, and free of bumps or loose nail heads before installation. A thin underlayment can also be used to decrease noise.
Tongue & Groove
Description
Similar to click lock flooring, tongue & groove hardwood planks are created with unique edge profiles which slot together. However, unlike click lock, this method requires an extra step: a bead of adhesive must be applied to the bottom of the groove before planks are placed together.
When using tongue & groove products, your must let the material "acclimate" inside at room temperature before you begin your installation. Otherwise, expansion, contraction, or warping may occur. The acclimation time varies by material, so consult the documentation that comes with your flooring.
Additional Tips: Be sure to provide space at the wall for expansion on all sides, and pull planks from a variety of cartons to blend the color tones.
Requirements
Can be used on ground-level or above-ground subfloors, including those made of plywood, OSB (Oriented Strand Board), concrete, tile, or radiant heating systems. The subfloor must be clean, dry, level, and free of bumps or debris before installation. A thin underlayment can also be used to decrease noise.
Nail Down or Staple
Description
With nails or staples, planks are secured directly to the subfloor. As a result, this installation method requires the purchase or rental of the hardware and various tools (for example, a pneumatic nail gun and air compressor).
Exact instructions vary slightly by product type; engineered hardwood requires a nail or staple every 4–6” along the edges, while solid hardwood only needs to be fastened every 8–10”. Consult the documentation that comes with your flooring. And, be sure to orient your boards perpendicular to the floor joists.
Additional Tips: You must let your material "acclimate" inside at room temperature before you begin your installation. Otherwise, expansion, contraction, or warping may occur. Acclimation time vary by material, so consult the documentation that comes with your flooring.
Requirements
Can only be used on suspended wood subfloors, such as plywood or OSB (Oriented Strand Board). The subfloor must be clean, dry, level, and free of bumps or debris.
Glue Down
Description
Gluing down flooring is one of the most durable installation methods, because boards are completely and permanently adhered to the floor. Squeaks and noises are unlikely, and the glue offers enough flex to accommodate expansion.
First, adhesive is spread on a portion of the floor. To prevent it drying out, only use as much as can be covered within 2 hours (generally around 2.5 to 3 feet). Then, planks are pushed directly down into place on the adhesive; never slide them into place. Finally, plank tops are cleaned of any excess glue with mineral spirits.
Additional Tips: You must let your material "acclimate" inside at room temperature before you begin your installation. Otherwise, expansion, contraction, or warping may occur. Acclimation time vary by material, so consult the documentation that comes with your flooring.
When using this installation technique, orient your boards perpendicular to the floor joists. Provide space at the wall for expansion on all sides, and pull from a variety of cartons to blend the color tones.
Requirements
Can be used with ground-level subfloors including those made of plywood, OSB (Oriented Strand Board), concrete, tile, or radiant heating systems. The subfloor must be clean, dry, level, and free of bumps or debris.
Laying Tile
Description
Installing tiles utilizes thinset mortar, which is the "glue" that is applied under the tile and holds it to the floor or wall. Tiles are then laid on top, with plastic spacers between each tile for consistent distance between them. After the mortar cures (usually in 1 to 2 days) grout is worked into the spaces between the tiles to create a waterproof barrier. Lastly, excess grout is buffed off the tiles' surface.
If considering installing tile yourself, understand that precision is imperative with this installation method to ensure a quality result. To avoid crooked rows or uneven surfaces, tiles must be constantly checked during installation to ensure they are level horizontally as well as vertically.
Requirements
Proper surface preparation is critical. The surface–subfloors especially–need to be completely flat and level, then covered with the appropriate water-resistant underlayment. After installation, consider sealing tiles and grout for further waterproofing.
Carpet Installation
Description
Remove all manageable items from the installation room including bedding and breakables. Thoroughly vacuum the old carpet to minimize dust and particles becoming airborne during the removal process. Prepare a designated workspace for your installer with easy access to power outlets. Once the carpet is removed make sure the subfloor is structurally sound. Make any necessary repairs prior to installation.
Common installation methods include using tack strip and stapling your carpet in place. Your professional carpet installer will recommend the best installation method for your needs. When your new carpet has been installed, vacuum it to remove any loose fibers.